I thought I would share the production experience of making The Approach documentary for my final with some behind the scenes of my own experience on the project. When I first signed up for this documentary class I didn't know what to expect, but after the first day after meeting the crew, I was sure we would end up with something worthwhile, because of the variety of personalities in the class. All of other treatments presented were really interesting and had great potential to tell a story that most could relate to. Once we had presented our ideas. We all voted on a treatment and began within the next few days pulling together our characters and setting up shoots and interviews. I felt especially lucky because most of these people that we would be following for this film were people that I grew up with in this community it was my environment.
Here is a photo of us before we knew each other, in the beginning.
The idea of this movie was to encourage those who watched it to connect with the choices we make in our life, as far as doing the things we love, the things that give us passion or doing things for the money or because we have to, and finding those who find a way to incorporate the two.. It focuses on how each of us approach our lives, our philosophies, and our passions.
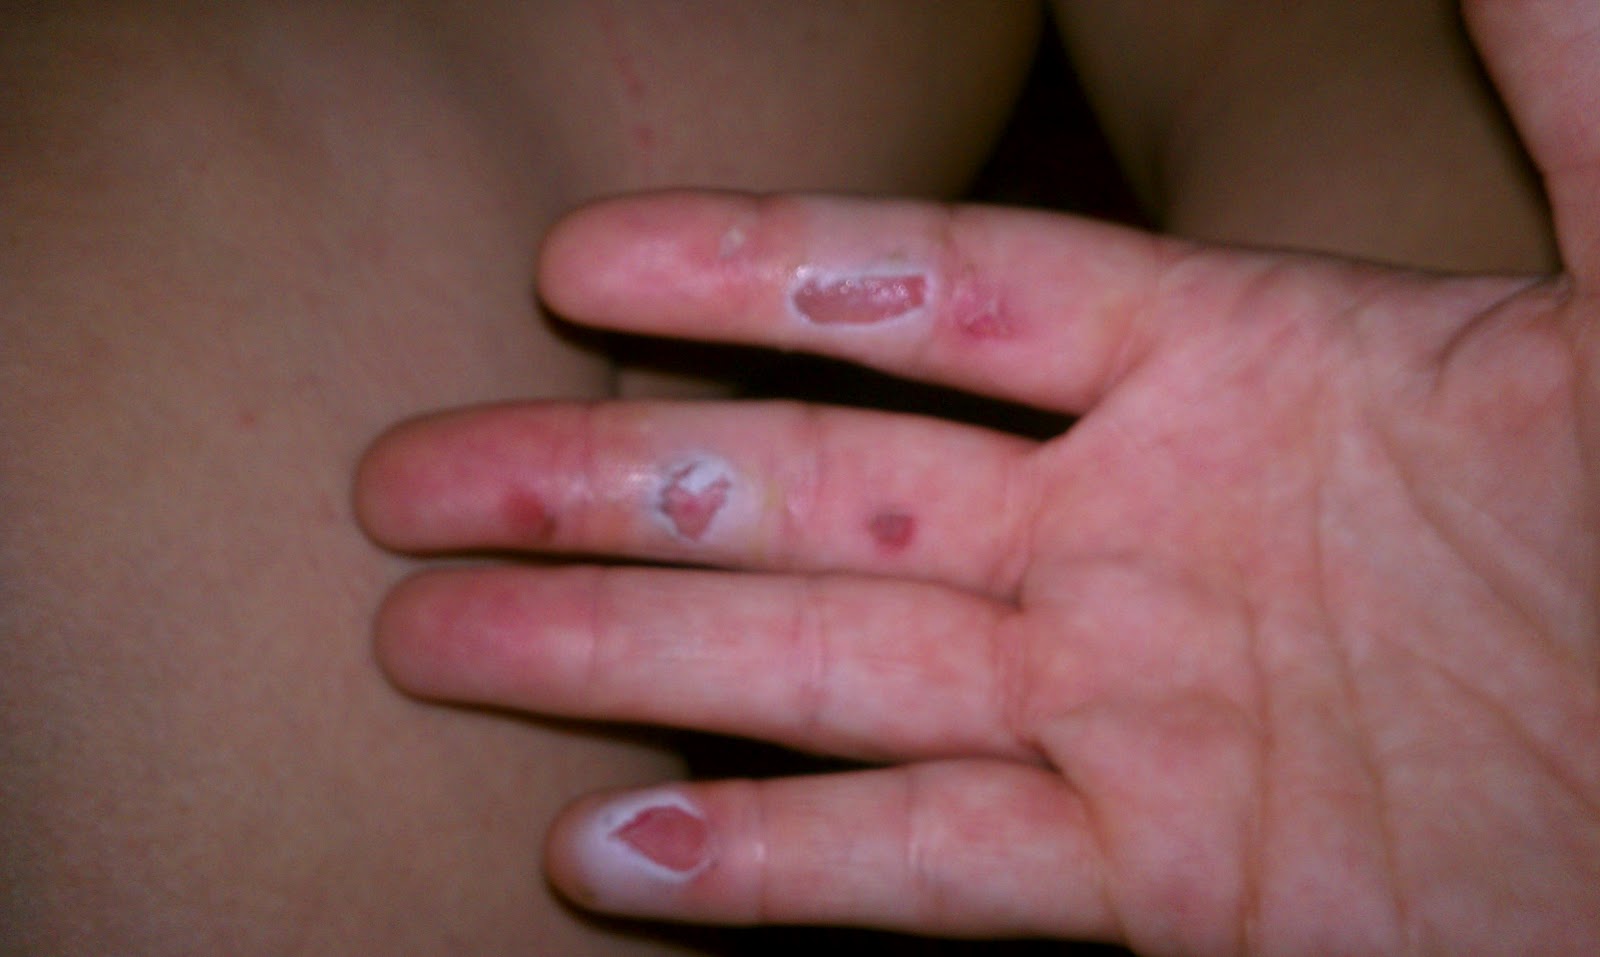
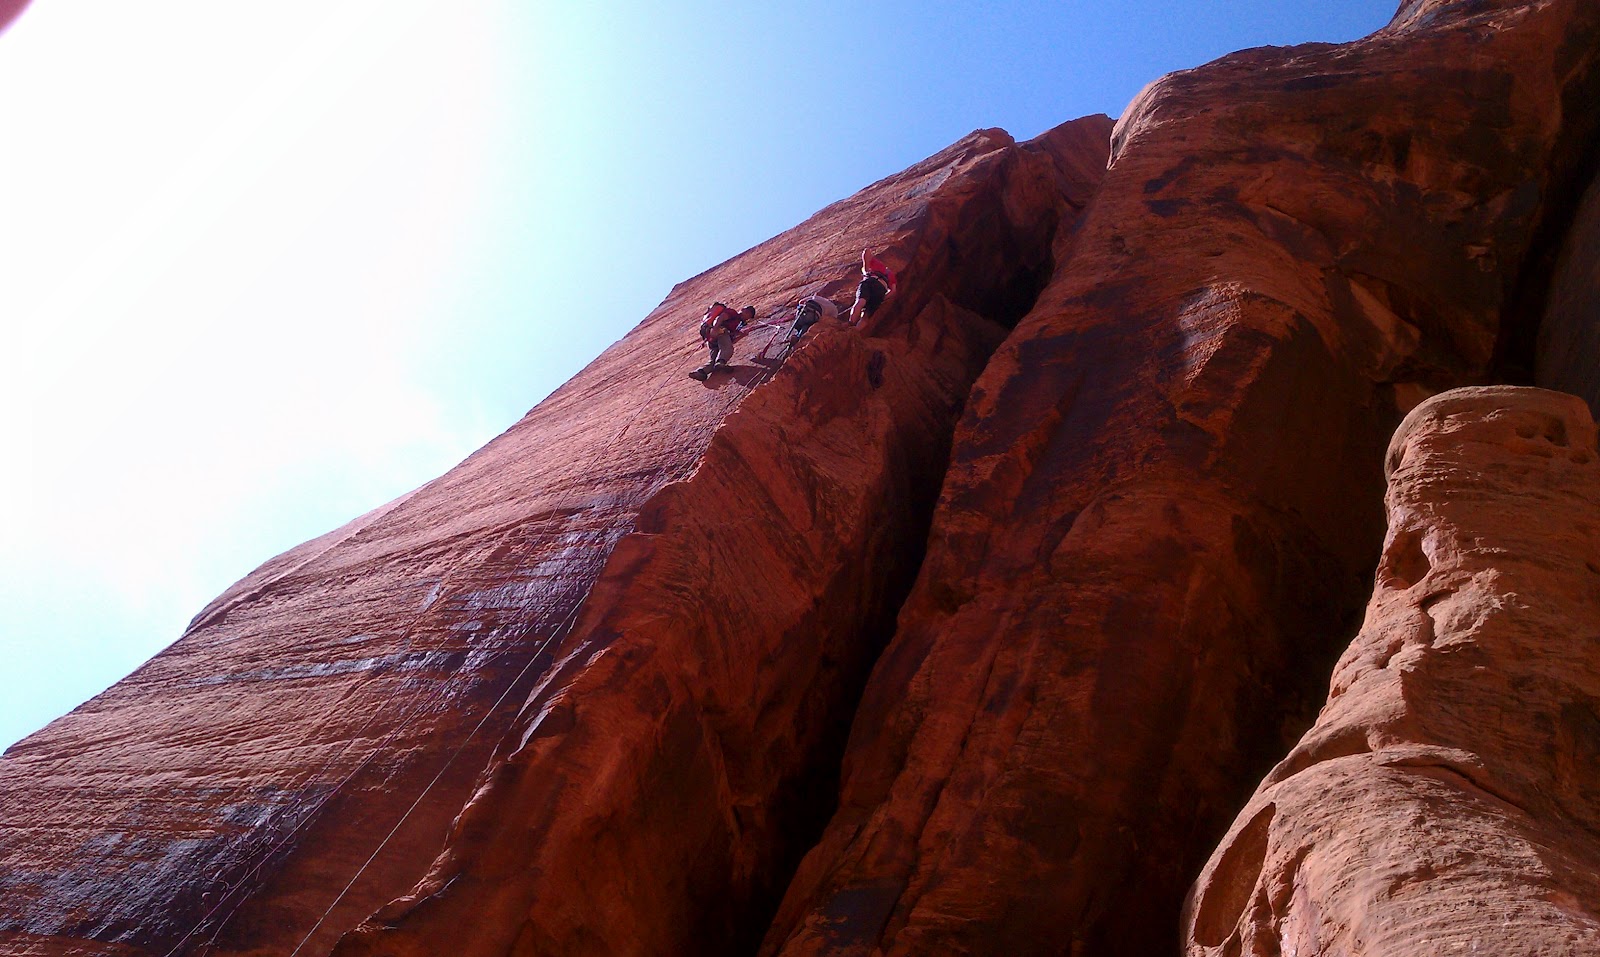
Making this film was a great reminder of teamwork to me. This could not have been accomplished if we had not worked together. We all had many aspects to contribute which is why I think that we completed this endeavor in the short amount of time we were given. Not to say we didn't run into frustrations along the way. At one point we thought we had lost all the footage to a shoot that took us almost 8 hours, after hiking into the location and packing cameras and audio up a 300 foot cliff. Here are my hands after the day of shooting and ascending up the Jumar to the top and repelling down with the crew. Not something you want to be wasted time!
Over the period of production I think all of us have been able to relate to the theme of our story, "some live what they love others make time to do what they love." We all at one point I think reflected on this with our own lives. I know that I myself did. It made me really grateful that Im finally doing what I feel passionate about and that is being a part of telling others story, their experiences and perspectives in life.
Working with Phil Tuckett, Ben Braten, and Luke Draper was a pleasure and an education. This made me realize how lucky we are to have the resources we do as students of Dixie State College.
For my Post-Production
research I chose NLE (non-linear editing). I have had the experience this
semester to make a documentary film, and in this process I have been through
pre-production, production, and post-production. Each one of these processes
have been an experience of it's own.
We are actually at the tail end of post-production. I have been involved for the most part
with the story formation and the gathering of content. But I am also a part of the
assistant editing crew. I have
been doing the first stages after the all the footage has been collected, doing
something called logging. This is
the process where you watch and sort through all of the footage by marking
certain points with colored markers and brief written descriptions of what that
sequence or frame contains. This
helps for the editors to begin piecing together the story.
After the editors have a cognitive timeline from each area of the story it is taken to the editor chief which in our documentary would be Luke Draper, he then goes through and adds music as well as coordinates the voice overs if necessary. Then whole process is a combination of the writers, directors and editors vision for the film. It is a process that can be repeated very many times until it is fine tuned and ready for the final stages. Color corrections are done and syncing of any of the the audio.
Color correction is where the
color in each shot is made to look consistent, and any problems, such as over
or under exposure, are adjusted. Online editing is the final stage of editing,
where all of the shots are color corrected and assembled with the highest
possible resolution. Finally, mastering is the process of transferring the
edited film, with soundtrack and all, onto a master copy, from which all copies
of the film will be made. A lot of work to ensure that the film looks its best!
An important thing for editors to keep in mind because of the mass amounts of footage and information that they will have to go through is something called the rule of six. This helps an editor to decide what to use and what to leave out.
The Rule of Six
When editing a video project you have to keep in
mind both the spatial and contextual continuity for a given scene. You have to
keep in mind that the action is a small part of the entire film and that the
various angles it was captured in need to be put together in a way so the
audience will be able to understand what is occurring. The Rule of Six can
designate these elements, which are the six points that need to be considered
when cutting together a scene. The order of importance of these is different
depending on whom you ask, but the following is a good hierarchy to consider.
1. Emotional Continuity
The most important goal of editing a scene is the
emotion that it should hold. Keep the tone of the film in mind, as well as the
specific aspect of the overall sense that the scene should carry. When
selecting shots, length of cuts, and transitions, think about how the rest of
the scenes were edited, then how this scene fits into the whole. Try to never
violate the feelings in the moment for story or spatial continuity. It is
better to keep the overall tone of the film continuous because that is what the
audience will pick up on most.
2. Story/Plot
The story is also very important, so make sure that
this scene fits in perfectly with the whole film. Place it in correct order,
and make sure that the scene clearly portrays what has happened. If a given
scene is not clear then the continuity of the plot will be lost and the
audience will disconnect.
3. Rhythm
Think about the rhythm of the film, and the other
scenes, and make sure that the edits you do on a sequence maintain this. You do
not want to suddenly have a scene that breaks the film up and loses the
audience’s focus. If a scene does not seem right for its location then it
should be cut entirely.
4. Eye-Trace
Eye-trace is the first of the last three items of
the Rule of Six, which if they were all put together, would not be as important
as one of the first three. This means that you should keep in mind what the
audience will be looking at in each frame, and to make sure that you have
everything exactly where you want the audience to see it. For example, if you
have main action happening and you would like the audience to focus on it then
put it in a central spot in the frame, and do not let background objects or
action take over the image.
5. Two-Dimensional Space
You have to make sure that your edits maximize the
two-dimensional aspects of the frame. The screen is a two-dimensional image,
but you are trying to portray a three-dimensional world. Make sure you cut
together correct images so that it will
continue to give the illusion that they are watching a three-dimensional event.
This means respecting things like the Z-Axis and staggered depths of field.
6. Spatial Continuity
The last one is to make sure to maintain the
spatiality of the three-dimensional space in the frame. This means that there
should not be jump cuts and that all movement in the frame accurately
represents the space that you are trying to portray to the audience. This means
that you need to show all movement through a series of shots, and do not let
someone jump from one side of a room to another without showing them move to that
second location.
Here is another video with Walter Murch talking more on the the rule of six with I found it helpful to understanding why, when and how to use it.
All Important
Though they are listed in a descending order of
importance, they should all be considered important. A great editing job will
make sure that all of these elements are at play, and that the scene works as a
whole, keeping in mind both the audience, and the integrity of the piece.
I did my production research on the Steadicam.
I was intrigued when we were able to try the actual camera on and feel
what it was like to use this piece of equipment. When we were able to try it on
and move around you could see how it can be a profession in it's self. It
takes getting comfortable with this piece of equipment.
It inspired me to do some research on
the history, uses, and profession of the steady cam.
To began lets define what a
Steadicam is. The steadicam is a device that functions as a stabilizing
mount for a motion-picture camera. By utilizing a Steadicam, it is possible to
capture action without causing unintentional jerky movement or lack of focus in
the shot. The steadicam can take on a couple of different forms, depending on the
type of camera in use and the environment in which the camera is utilized.
When many people think of the
steadicam, the first thought that comes to mind are the support systems that
are used for cameras shooting on movie lots or locations. These larger and more
powerful cameras are often loaded onto a hydraulically controlled stand that
help to relieve the camera operator of exerting physical energy to hold the camera
steady. These larger examples of a stabilizing mount may include seating for
the cameraperson or allow space for the operator to stand behind the unit and
focus the angle and lens. The value of these types of larger steadicam supports
is that the camera can be easily moved to accommodate the action being filmed
without creating issues such as fuzzy focusing or rapid movements out of range.
(http://www.wisegeek.com/what-is-a-steadicam.htm)
As with any type of technology
the steadicam is infinitely changing. Garrett Brown the Steadicam had an
immediate impact on how films were shot first introduced Steadicams in the
1970’s. Before his invention if filmmakers wanted tracking
shots (i.e. ones where the camera moves), they
were limited to using a dolly track or hand-heldwork.
At an EG conference Brown gave a talk where he described how he came up
with the idea for his revolutionary camera rig and its subsequent
application in movies, sports broadcasting and industry.
This video link is a bit long, but so
inspiring. It helps you to appreciate where we are in the film industry
today thanks to people like Garrett Brown.
After shooting a demo reel with a
prototype rig, he caught the attention of Hollywood and it led to work on such
films as Bound for Glory (1976),
Rocky (1976) and The Shining (1980) as well as an Academy Award of
Merit.
The
Steadicam Shot
Operating a Steadicam is one of the
most difficult jobs on a movie set, but it is also one the most rewarding. For
a typical Steadicam shot, a cameraman must follow a predetermined path,
while simultaneously adjusting the camera and avoiding any obstacles, all the
while supporting more than 60 pounds of camera equipment.
The job requires a good deal of
physical stamina and technical skill, but it also calls for a good sense
of shot composition. The director plans the shot, but the Steadicam
operator makes it happen.
The best technique for Steadicam
operation depends entirely on the nature of the shot. To film a simple
conversation between two actors, an operator may try to replicate the even feel
of a dolly shot, keeping the camera perfectly level and moving it slowly around
the action. For a "flying sequence" over low ground, the operator
might intentionally tilt the camera from side to side, creating a soaring
effect.
One of the most common uses of the
Steadicam is to track actors as they move around obstacles or rough ground.
Typically, the operator will walk ahead of the actors, shooting them from the
front as they walk and talk. For this sort of shot, the operator may walk
backwards through the scene, with the help of other crewmembers. Or he or she
may walk forward, with the camera pointing behind him or her. For these shots,
and most any other shot, the director, the crew and the operator will all work
together to figure out the best approach.
The
Steadicam Profession
Most professional Steadicam
operators work freelance, renting themselves as well as their equipment
out as a complete package. When a scene in a film calls for a Steadicam shot,
the filmmakers will select a Steadicam operator based on his or her past work.
Most established Steadicam operators are members of the Steadicam
Operators Association (SOA), founded in 1988
by Garrett Brown. In addition to representing hundreds of Steadicam operators,
the SOA holds regular Steadicam training workshops. Tiffen, the company that
manufactures Steadicams, also organizes training sessions.
Steadicam operators have helped
create some of the most memorable shots in film history. In "Rocky"(1976), one of the first feature films to use the steadicam,
Garrett Brown let the audience follow Sylvester Stallone as he ran up the steps
of the Philadelphia Art Museum. This shot, one of the most memorable in the
movie, would have been nearly impossible before the Steadicam. In "The
Shining"(1980), director Stanley Kubrick used
a Steadicam shot to zip down the hallways of a haunted hotel, and another to
follow Jack Nicholson through a snowy hedge maze.
Martin Scorsese, Paul Thomas Anderson
and many other directors have used extremely complex Steadicam sequences to
establish mood and setting. In "Goodfellas" (1990), Scorsese used a Steadicam to bring the
viewer into the bustling Copacabana restaurant. In a single five-minute shot,
the audience follows Ray Liotta in the back door, through the kitchen and up to
the bar, stopping to meet patrons all the way. It's one of the most mesmerizing
sequences in the movie.
Steadicams are also used
in special effects sequences. For the speeder bike chase in "Return
of the Jedi" (1983), Garrett Brown walked
the camera very slowly through parts of California's Redwood National Park. The
special effects crew sped this footage up and combined it with blue-screen
footage of the actors on bikes for one of the
most exhilarating chase sequences ever filmed. Without a Steadicam, the footage
would have been way too shaky when it was sped up.
Steadicams have given filmmakers and moviegoers
alike a new freedom of movement. With a Steadicam, a director can float the
camera (and, by extension, the audience) into a forest, through a crowd of
people, or down into a cave. In TV shows like "ER," Steadicam shots
put the audience in the middle of the action, as if they were another character
in the show. This simple machine has truly changed the world of filmmaking
forever.
This first website is an iterative beat-boxing site that was created to help people discover the talent in the human beat-boxer. Very cool play around for a while making your own music by adding sounds and every now and then bonus features pop up and add to the melody. You can use it in manual or shuffle mode. Give it a try, and leave a comment of what you think. http://www.incredibox.fr/
This second example of a quiet structure website is advertising ZUNE the mp3 competitor for iPod. It has great graphics and amazing color. It's easy to navigate and inspiring. http://www.zunejourney.net/
Aa Bb Cc Dd Ee Ff Gg Hh Ii Jj Kk Ll Mm Nn Oo Pp Qq Rr Ss Tt Uu Vv Ww Xx Yy Zz
123456789
Ok I know this is the most basic font, but I have come back to it each time so after much searching this is the font I have adopted. This font fits me because of it's clarity and simplicity. It has become a default font for most basic word processing programs, because of it's clarity and it is easy to read. Most Serif fonts are not very appealing to me but this one has just a subtle serif nothing to distracting. I think it makes it clear and clean. I also like the kern between each letter. It flows and is pleasing to the eye.
I would use this font if I wanted to express a neutral message, or it could be used for a complex and simplistic one as well, this is one reason I chose it is because of this versatility. I think it would be categorized as a cross between slab serif font because it has a fairly even line weight and modern because of the small variances in the thick and thin lines. It is a very vertical standing font without much slant if any.
If I were looking for a headline or something to draw attention or emphasize creativity I would go with a very different font one of those beingKaty Berrybecause of its creative possibilities it is very artistic and while I have a very practical side I equally have a very creative side.
In the end the font I would choose would reflect the message I was wanting to portray or just the mood I might be in.
The Cambria Font Family was designed for on-screen reading and to look good when printed at small sizes. Cambria is part of the new Windows ClearType font collection. The Cambria fonts have excellent legibility and readability characteristics. Cambria replaces Times New Roman as a Windows Vista and Microsoft Office default serif font.
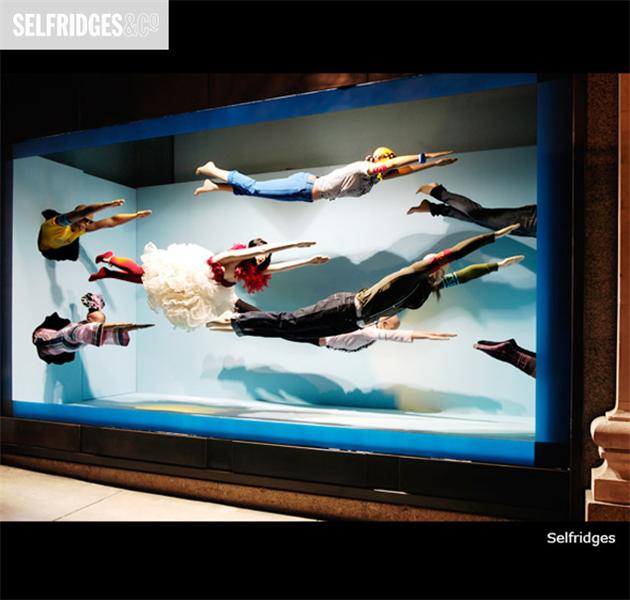
These displays fall under the catogory of exhibit. When I first started looking for these window displays it was overwhelming the amount of contrast and creativity. Even within the displays themselves there are sub categories lighting, motion, clothing, shoes electronics, holiday etc... So believe or not this is my narrowed down comparisons. The Category I chose to analyze is apparel.
Good designs...
This first display is an interactive window display for a street wear label WeSC. Please follow this link to watch a demonstration of the interactive store front:
I think that this interactive window display demonstrates the elements of
Simplicity, and Figure Ground Relationship which are
elements that are perceived as either figures (distinct elements of focus) or ground (the background or landscape on which the figures rest).
along with Uniform Connectedness which by definition is
elements that share uniform visual characteristics are perceived as being more related than elements with disparate visual characteristics.
Common Fate
Humans tend to perceive elements moving in the same direction as being more related than elements that are stationary or that move in different directions. This is one of my favorite displays that I came across. First of all it absolutely grabs your attention, and it demonstrate
The Law of Proximity very well.
Closure is represented here as well as the Law of Continuity. When looking at a complex arrangement of individual elements, humans tend to first look for a single, recognizable pattern. I think this demonstrates this very well. The metal stakes that frame the shoes are also similar to them and so it has continuity as well.
This demonstrates the Law of Prägnanz, it is a display window for shoes in europe.
Humans tend to interpret ambiguous or complex images as simple and, along with the similarity of this display.
Again the Law of Prägnanz is how
humans tend to interpret ambiguous or complex images as simple and complete. This image demonstrates that by leaving the un seen pieces of the the women and the ice cream for your imagination, it does not take away from the closure but that you really do know exactly what is missing. Therefore it has Simplicity in it as well.
This is an add for the clothing store Anthropology. The clothing is very well framed by the horns and the lighting. The Law of similarity is represented by the time period pieces and the style of the clothing. The Law of Continuity is also shown here,it is when
elements are arranged on a line or curve are perceived to be more related than elements not on the line or curve. Other elements represented here are, Closure, Pragnaz, Common
Fate, and Figure ground relationship.
Bad design...
These are examples of bad design. They almost hurt to look at because there is so much confusion going on. Gestalt principle seems disregarded completely. There is no law of similarity, no simplicity, no law of proximity nothing goes together it is just a lot of noise. There are no lines to draw your eyes in any direction and no depth or quality to these designs.
The contrast in this image for me is the light rock against the small dark rocks. The lighting came out very clean and smooth which added to the texture of the smooth stones.
The Harmony is the roundness to the rocks and the direction the lighter rocks are going this photo gives me a really peaceful feeling and like there is somewhere beyond what we see.
The balance is in the flow of the the colors and the direction the lighter rocks take your eyes to the top of the photo. I think it is a very organic and the texture is what appealed to me most.
This is my post on my visual response. I found this video on street painting and it just blew me away the ability to have this perspective and create something this large. It is absolutely beautiful and I admire this vision.
Tom Dayton is a local man who has a love for music. I asked him for an interview and a sample of his DJ skills here are some pics and one of his mixes and Im working on the finishing touches of the interview. Enjoy